Once again I am a slacker! Life is just so hectic with an almost 1 year old that it is hard to find time to blog. Maybe one of my New Year's resolutions will be to make time to blog? Anyways, for now here is a quick update on us.
Jameson is all over the place! Crawling, standing, walking along the sofa, up the stairs, down the stairs (even falling down the stairs). Yes, you heard me, falling :( Thankfully he wasn't hurt, he actually pushed the baby gate over and rode it all the way down the stairs. Thankfully Ninja Mommy reflexes were fast and I caught him mid cartwheel at the bottom of the stairs! I had a panic moment and blamed it all on Zack of course :)
Thanksgiving was a bit more eventful that usual. Zack's grandmother passed away a few days before so between visitations, funerals and lots of family in town it was crazy but honestly I really enjoyed having all of the family together. It made for a very successful holiday dinner.
Lets see...Jameson now has 3 teeth and still has 3 more coming in at the moment.
Jameson has the cute little Miss America wave again and his little personality is just shining through. He is going to be mister social, I can already tell! We went to dinner a couple nights ago and he was a hit with everyone. People kept stopping and telling us how adorable he was and Jameson just smiled and waved.
Jameson met Santa yesterday and I was so surprised when he was scared of Santa. He has never been afraid to go to anyone. Hopefully the pictures turn out!
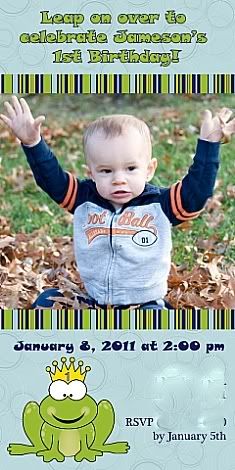
He turned 11 months yesterday! Only 1 more month until the big day!! I am planning a big frog themed shindig for him. I will be sure to post pictures of it. I can already feel a panic attack coming on just thinking about my baby being 1!! That should make for a good blog entry. Here is the invite...

That is the very truncated version of us. So ta ta for now!
Have a Merry Christmas and Happy New Year (you know in case I slack some more)!

Jameson is all over the place! Crawling, standing, walking along the sofa, up the stairs, down the stairs (even falling down the stairs). Yes, you heard me, falling :( Thankfully he wasn't hurt, he actually pushed the baby gate over and rode it all the way down the stairs. Thankfully Ninja Mommy reflexes were fast and I caught him mid cartwheel at the bottom of the stairs! I had a panic moment and blamed it all on Zack of course :)
Thanksgiving was a bit more eventful that usual. Zack's grandmother passed away a few days before so between visitations, funerals and lots of family in town it was crazy but honestly I really enjoyed having all of the family together. It made for a very successful holiday dinner.
Lets see...Jameson now has 3 teeth and still has 3 more coming in at the moment.
Jameson has the cute little Miss America wave again and his little personality is just shining through. He is going to be mister social, I can already tell! We went to dinner a couple nights ago and he was a hit with everyone. People kept stopping and telling us how adorable he was and Jameson just smiled and waved.
Jameson met Santa yesterday and I was so surprised when he was scared of Santa. He has never been afraid to go to anyone. Hopefully the pictures turn out!
He turned 11 months yesterday! Only 1 more month until the big day!! I am planning a big frog themed shindig for him. I will be sure to post pictures of it. I can already feel a panic attack coming on just thinking about my baby being 1!! That should make for a good blog entry. Here is the invite...
That is the very truncated version of us. So ta ta for now!
Have a Merry Christmas and Happy New Year (you know in case I slack some more)!

Comments
Post a Comment